Submitting#
Students are to submit all Checkpoints into Replit. It’s simple. Click the “Submit” button. Once you submit, the date-time is recorded. If you need to change your files, go ahead. But, your changes won’t be seen by Mr. Stride until you hit the “Resubmit” button, at which point, the date-time will change. If the new date-time is after the due date, some penalties may apply.
Students are to submit the Homework Assignments to Code SubStation. This page explains why and how.
Why?#
Often a student will develop their code in Replit, which is awesome for several reasons:
There may be some Unit Tests available
The work is hosted in the cloud which means the files are available on any computer with internet access
There is no installation to worry about
However, Mr. Stride uses a tool to help him more quickly grade the code. The tool does the following:
Runs extra, student-unseen Unit Tests
Follows a rubric that is defined for each assignment
Quickly summarizes scores allowing Mr. Stride to more quickly enter the scores into the gradebook
Emails students the rubric scores and comments
Allows resubmissions at anytime; it helps highlight differences
Supports easily & quickly reusing comments across students
Getting Access#
To start using the Code SubStation you need to first register your Google Authentication with this site. All you need to do is visit the site using your Student Google Credentials. There is a bug with the site and you may get an error at first. Simply retry and it should display the site. You won’t see any classes or assignments at the get-go.
Second, Mr. Stride needs to add you to a class. He cannot do this until you register with the site.
Submitting Files#
Each assignment will have requirements about which files to submit. The list of files to submit should be provided for you in the Homework Assignment. The experience you have can be best explained by describing the submission rule categories:
Restricted: You may submit only the required files. You are not allowed to submit any other files.
Open: You may submit any file that hasn’t been explicitly disallowed. This is necessary when students are allowed (perhaps required) to create test files. Or, it may be the assignment is open-ended and it is impossible to know the names of all the files.
Some files will be explicitly disallowed, such as tox.ini or cse163_utils.py. These are files that should
remain unchanged. If you change these files in order to get your code to work, you’re breaking the rules!!
And, as a consequence, your code may fail the Unit Tests on Mr. Stride’s machine during grading.
Downloading from Replit#
Most of the time, you’ll be developing your code in Replit. To sumbit your files, you’ll first need
to download the file from Replit to your local computer. Since there usually are not too many files
that you need to submit, you’ll often want to download each file individually.
In the list of files in Replit, hover over the file. You’ll see some vertical dots (ellipses) pop up on
the right-hand side. Click on the dots to reveal a menu of options. Choose, Download.
file(1).py
Students often will download a file from Replit multiple times. In Windows, each time you download a file
it is put into the downloads folder. If the filename already exists in the downloads folder, Windows will
append a parenthetical version to the filename. For example: the first time you download file.py, it will
be named file.py. If you download it again without having deleted the first file, Windows will download
the file as file(1).py. It is important to recognize that this is a different name!!
If the assignment requires file.py, you cannot expect file(1).py to work. Mr. Stride will not
rename the file for you. You must rename the file before submitting.
Uploading to Site#
On the Code SubStation, you’ll
select the class and assignment from the dropdowns on the left. This will open a pane on the right where you
can drag-and-drop your files, or browse to them. Once all the files are present, click the Submit button.
The expected successful submission behavior should be: the pane disappears, you get a verification pop-up, and the
file contents will appear in the Submissions tab.
NOTE: It is valuable to verify your submission. Use the instructions below.
Verifying Submisson#
After you upload all the required files, the Status column should read COMPLETE. If you are missing some required files, it won’t be complete.
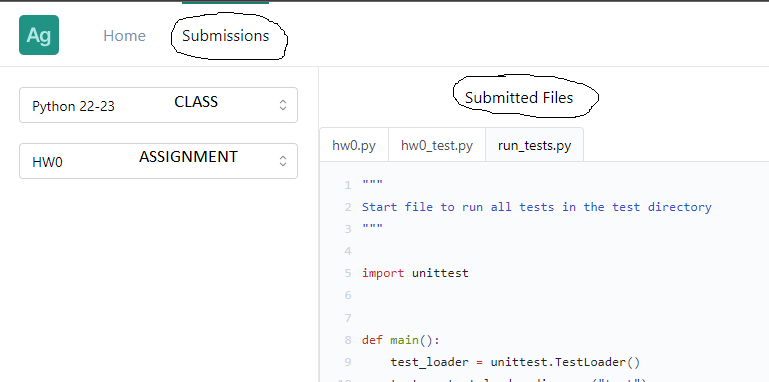
You can double verify that the upload was successful. On the top of the page, there are two “tabs”
named, Home and Sbumissions. Click the Submissions tab. Then, select your class and assignment from the
dropdowns. If your files were received, you’ll see some more tabs appear on the right. Click on the filename
to see the contents. If the code can be seen, the submission was successful!
If you don’t see your code, then it’s not there and Mr. Stride cannot see it either!
Submitting Subdirectories#
Sometimes it is appropriate to create subfolders[1] with datafiles. Creating a folder structure is an excellent way
to add clarity. In order to communicate the directory structure of your files, we make use of zip files. This adds
some complication to the submission process. Most of the time, zipfiles are disallowed and unnecessary.
For some assignments, it will be required that submit test files created in subfolders. You’ll create test files in subdirectories, zip the subdirectory, and submit the zipfile. This is extra work. Sorry!
Zip your subdirectories, but ONLY your subdirectories. If you have more than one subdirectory, you can zip them all into the same zipfile if you want, or you may keep them separate and submit two zipfiles. Do NOT zip up any other files. Zip up only the subdirectories you want to submit.
Here are some images to help you create a zipfile for this project (on Windows).
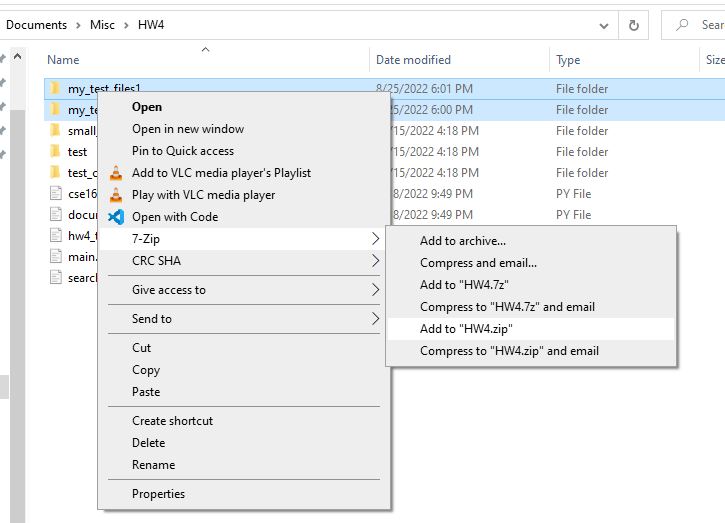
You’ll see that the two test directories are selected. Then, we right-click on the selection
and choose 7-Zip -> Add to "HW4.zip". Of course, not all computers are the same, so, here is
another option for you.
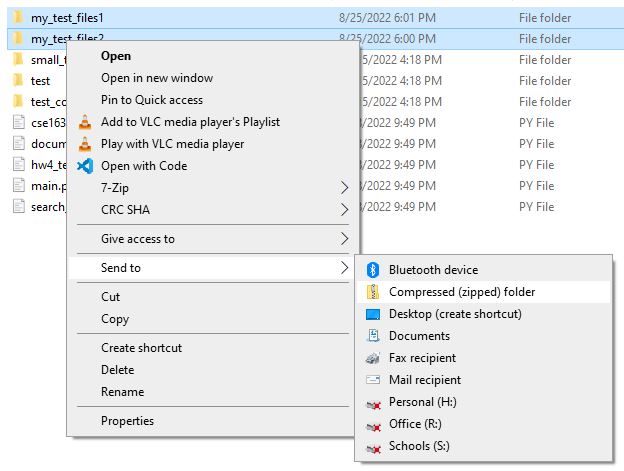
Again, the two test directories are selected. Then, we right-click on the selection
and choose Send to -> Compressed (zipped) folder".
Limitations
Zipfiles cannot contain any file in the working (or root) directory.
Zipfiles cannot contain any of the required files (which are always in the root directory).
When you resubmit a Zipfile, it should contain all the files of the original zipfile.
Footnotes#
[1] subdirectory and subfolder are identical. There is no difference between these two terms. We will use them interchangeably.